Notifications
Configure subscribers, subscriptions, and monitor the notification queue.
The notification system lets you react to provenance events by sending notifications through pluggable adapters. The dashboard provides three pages for managing this pipeline.
Subscribers (Adapter Marketplace)
The Subscribers page shows all available notification adapters as a card grid — think of it as a marketplace of integrations.
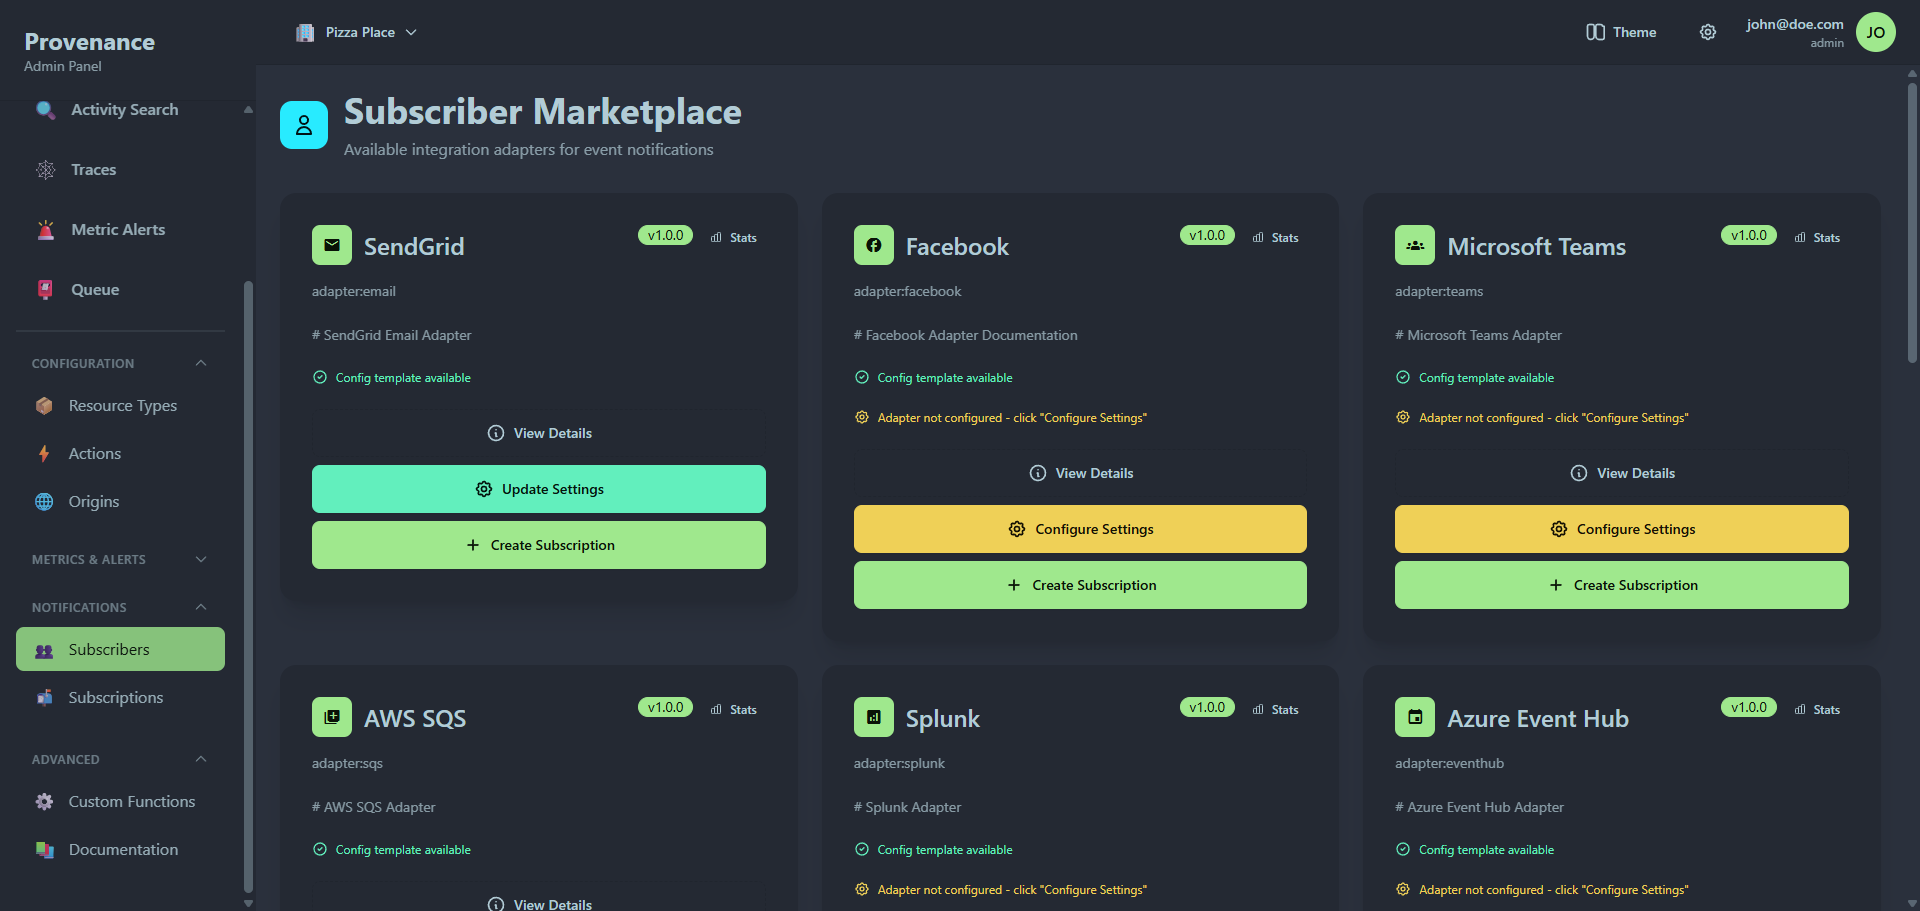
Each adapter card shows:
- Icon and name
- ARN — the adapter identifier (e.g.
adapter:slack) - Version badge
- Description — first line of the adapter's documentation
- Config template available — green checkmark if the adapter provides a JSON schema for structured configuration
- Status indicators:
- ⚠️ "Adapter not configured" (yellow) — global settings haven't been saved yet. Click Configure Settings to set them up.
- ❌ "Environment compatibility issues" (red) — required environment variables or dependencies are missing. Click to expand and see which checks failed.
- Action buttons: View Details, Stats, Configure Settings / Update Settings, Create Subscription
Adapter details
Click View Details to open a modal showing:
- Documentation — the adapter's full description rendered from Markdown, including configuration examples and supported features
- Configuration template — the JSON schema that defines what fields the adapter accepts
- Integration details — subscriber ID, ARN, and version
Adapter statistics
Click Stats to see the adapter's notification activity over the last 30 days:
- Summary cards: Total, Completed, Failed, Pending
- Daily notification chart — bar chart showing notification volume per day
Configuring adapter settings
Click Configure Settings (yellow, first time) or Update Settings (green, already configured) to open the settings modal.
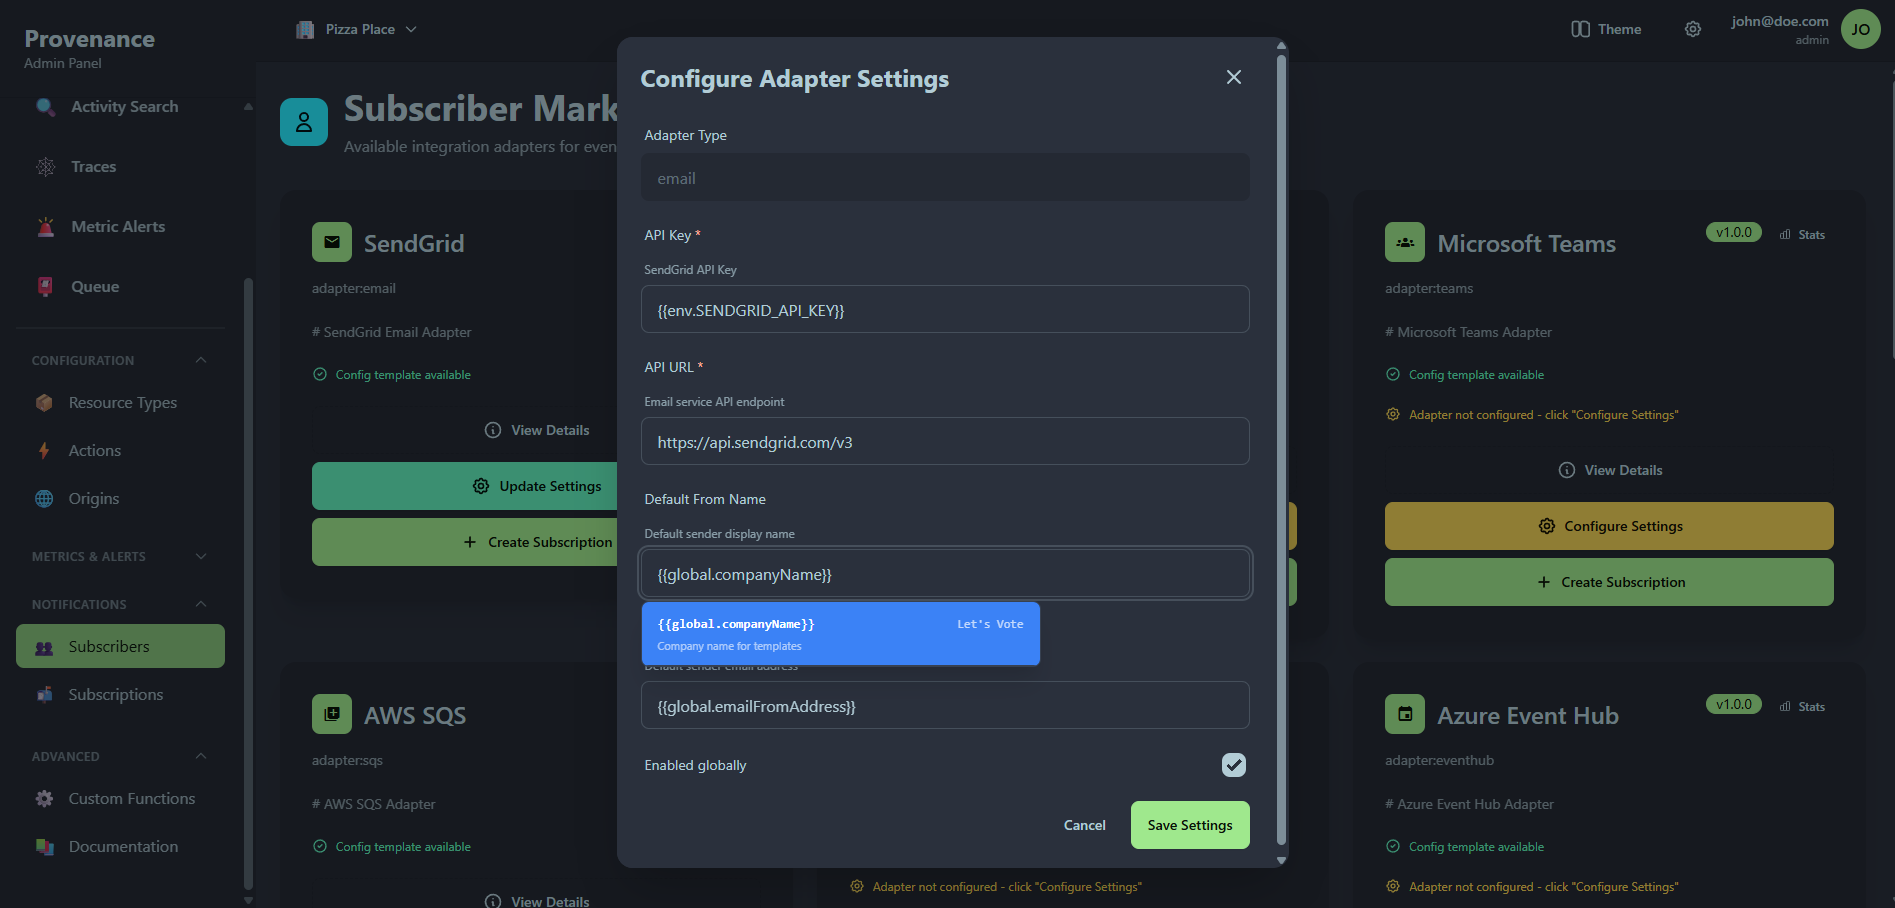
The settings modal adapts based on the adapter:
- Structured form — if the adapter provides a
settingsTemplate(JSON schema), the modal renders typed form fields: text inputs for strings, checkboxes for booleans, number inputs, and key-value pair editors for objects. Required fields are marked with a red asterisk. - Raw JSON — if no schema is available, a JSON textarea is shown where you enter the settings manually.
Every adapter settings form includes:
| Field | Description |
|---|---|
| Adapter Type | Pre-filled and disabled — identifies which adapter these settings belong to |
| Settings | The adapter-specific credentials and configuration (structured form or JSON) |
| Enabled globally | Toggle to enable/disable the adapter across all subscriptions |
Example: For the Slack adapter, the structured form would show fields for defaultWebhookUrl. For the SendGrid adapter, fields for apiUrl and apiKey.
Settings are shared across all subscriptions that use this adapter. Per-subscription configuration (like recipient email or channel) goes in the subscription config, not here.
Creating a subscription from an adapter
Click Create Subscription on any adapter card to navigate directly to the subscription creation wizard with that subscriber pre-selected.
Subscriptions
Subscriptions map events to subscribers. When an interaction matches a subscription's criteria, a notification is queued for delivery.
Subscription cards
Each subscription is displayed as a card showing:
- Subscriber icon and name — the adapter handling delivery
- Event description — "Notifies when Resource Type gets Action"
- Active/Paused toggle — a toggle switch in the top-right corner to enable or disable the subscription instantly
- Flow badges — a visual pipeline showing Origin → Resource Type → Action (with custom colors and icons from your configuration)
- Adapter ARN — e.g.
adapter:slack - Notification stats panel — a summary of delivery performance:
- Success rate — percentage, color-coded: green (95%+), yellow (80%+), red (below 80%)
- Total, Completed, and Failed counts with colored dots
- Shows "No notifications sent yet" if the subscription hasn't triggered
- Created date
- Action buttons: View, Edit, Delete
Pausing and resuming
Use the Active/Paused toggle on any subscription card to instantly enable or disable it. When paused:
- The toggle shows "Paused" in gray
- The subscription remains in the database
- The queue trigger skips it when matching new interactions
- Existing queued notifications for this subscription are not affected
Toggle it back to resume notifications.
Filtering subscriptions
Filter by action, resource type, subscriber, or origin using the filter bar.
Creating a subscription
Click New Subscription to open the creation form. The form is a 3-step wizard.
Step 1: Basic Information

| Field | Required | Description |
|---|---|---|
| Action | Yes | Which action triggers this subscription |
| Resource Type | Yes | Which resource type triggers this subscription |
| Subscriber | Yes | Which adapter receives the notification |
| Origin | No | Optionally scope to a specific origin |
When you select a subscriber, an info card appears showing:
- Subscriber name and description
- Whether a configuration template is available
- View Adapter Documentation button — expands inline documentation for the selected adapter, including configuration examples, supported features, global settings format, and template variable reference. This is the same documentation shown in the Subscribers marketplace details modal.
Step 2: Configuration
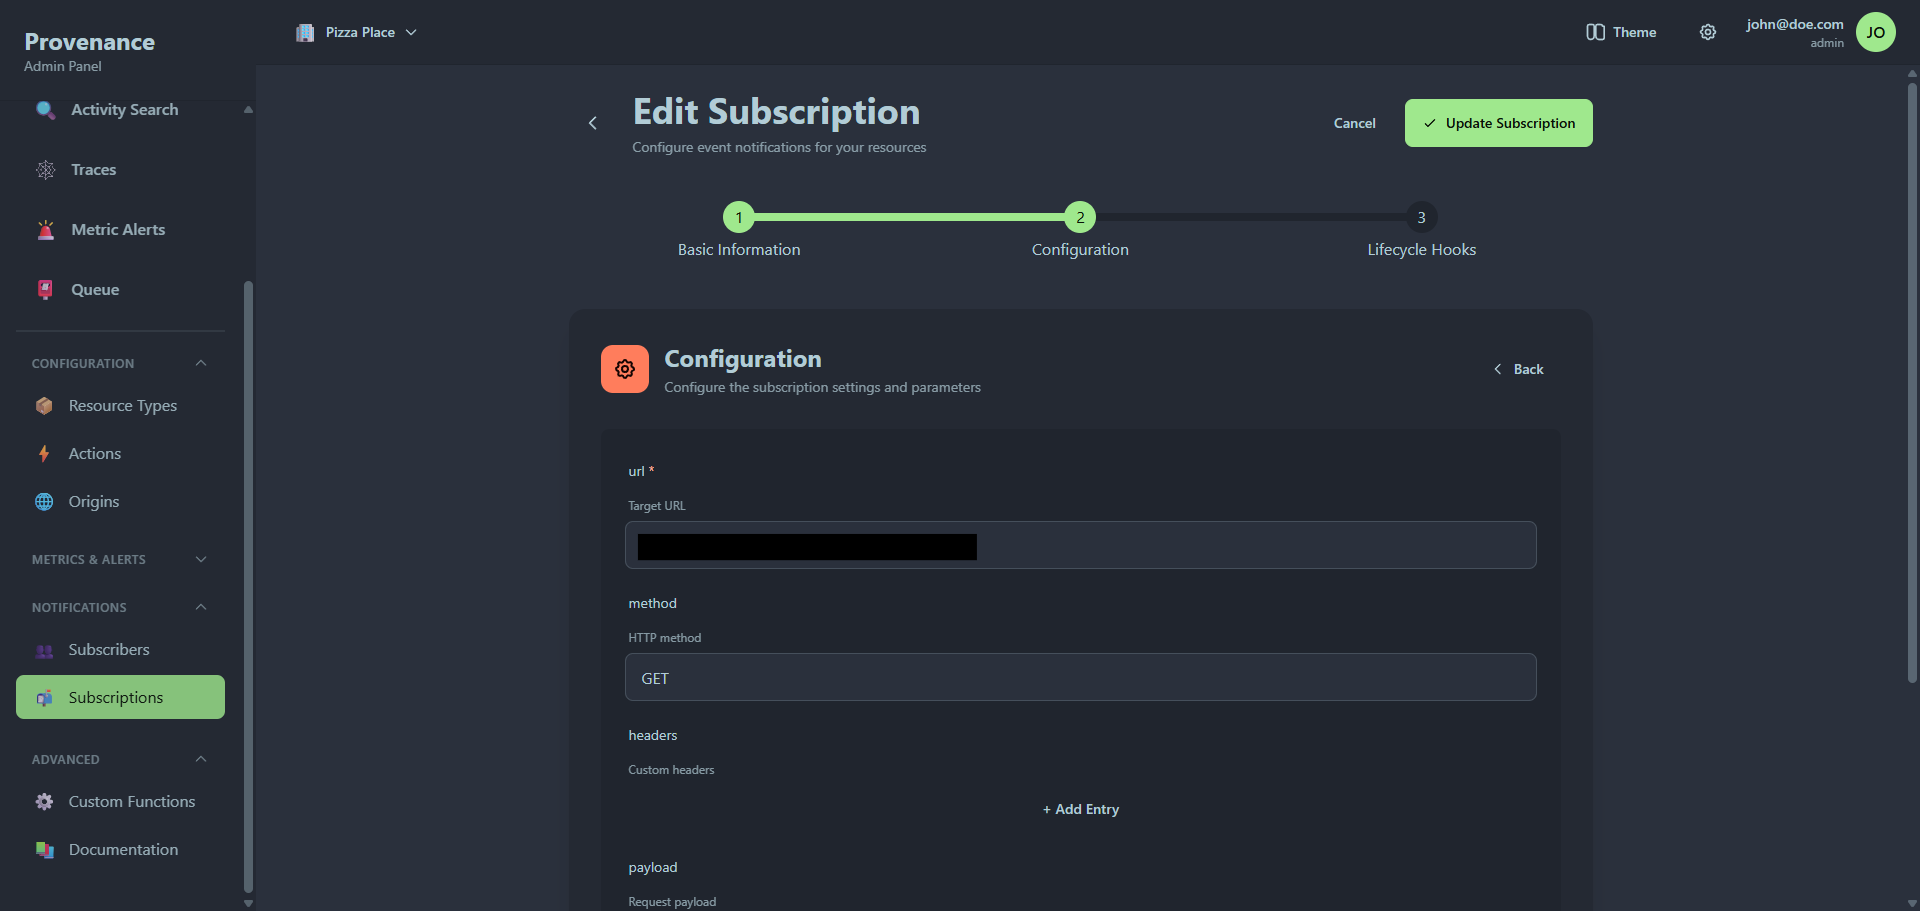
The configuration step adapts based on the selected subscriber:
- Structured form — if the adapter provides a
configTemplate(JSON schema), the form renders typed fields with validation. Required fields are enforced, and the form validates against the schema in real-time using AJV. A green "Configuration is valid and ready" message confirms when the config passes validation. - Template editor — if no schema is available, a raw JSON editor is shown with template variable support. The editor highlights
{{variable}}syntax.
Validation errors appear as a red alert listing each issue (e.g. "root: must have required property 'webhookUrl'").
Step 3: Lifecycle Hooks
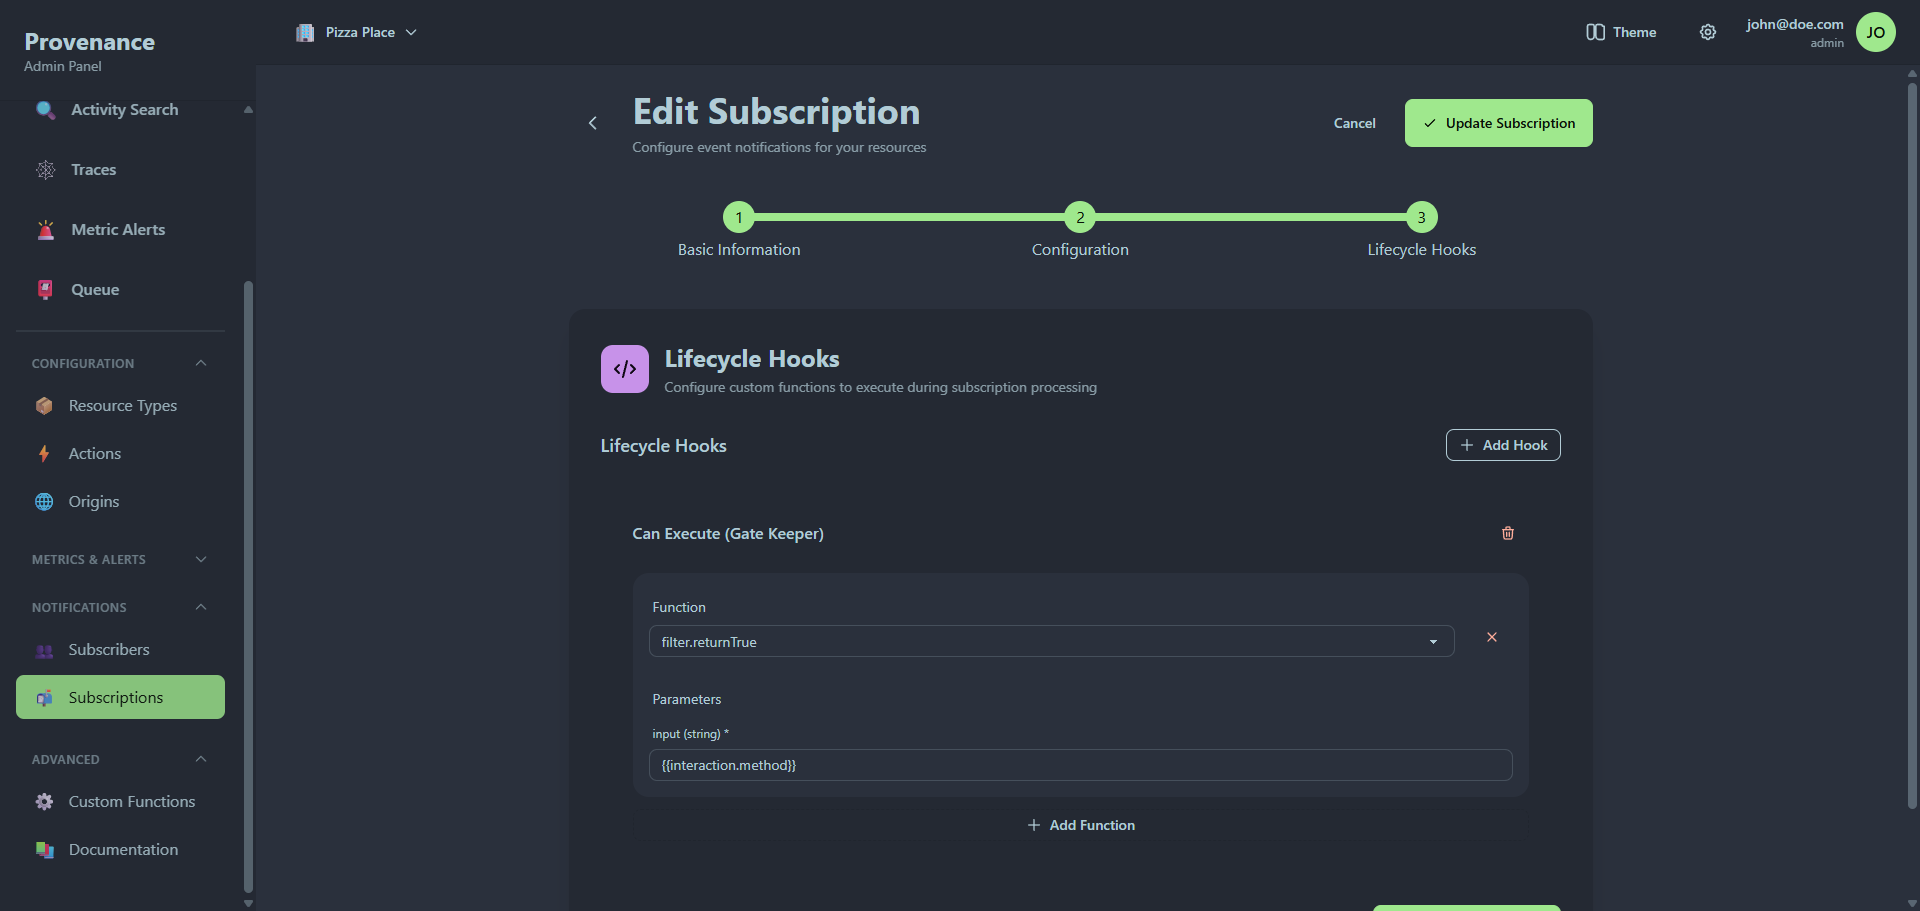
Configure custom functions to execute at different stages of notification processing. See Custom Functions for details.
Template variables
The configuration JSON supports template variables that are replaced at delivery time:
{{interaction.fieldName}}— any field from the interaction JSON{{global.settingKey}}— any global setting value{{resourceId}}— the resource ID{{action}}— the action mnemonic{{resourceType}}— the resource type mnemonic
Subscription detail modal
Click View to see the full subscription configuration, including the action and resource type badges, subscriber details, origin filter, and the raw configuration JSON.
Queue
The Queue page monitors and manages the notification delivery pipeline.
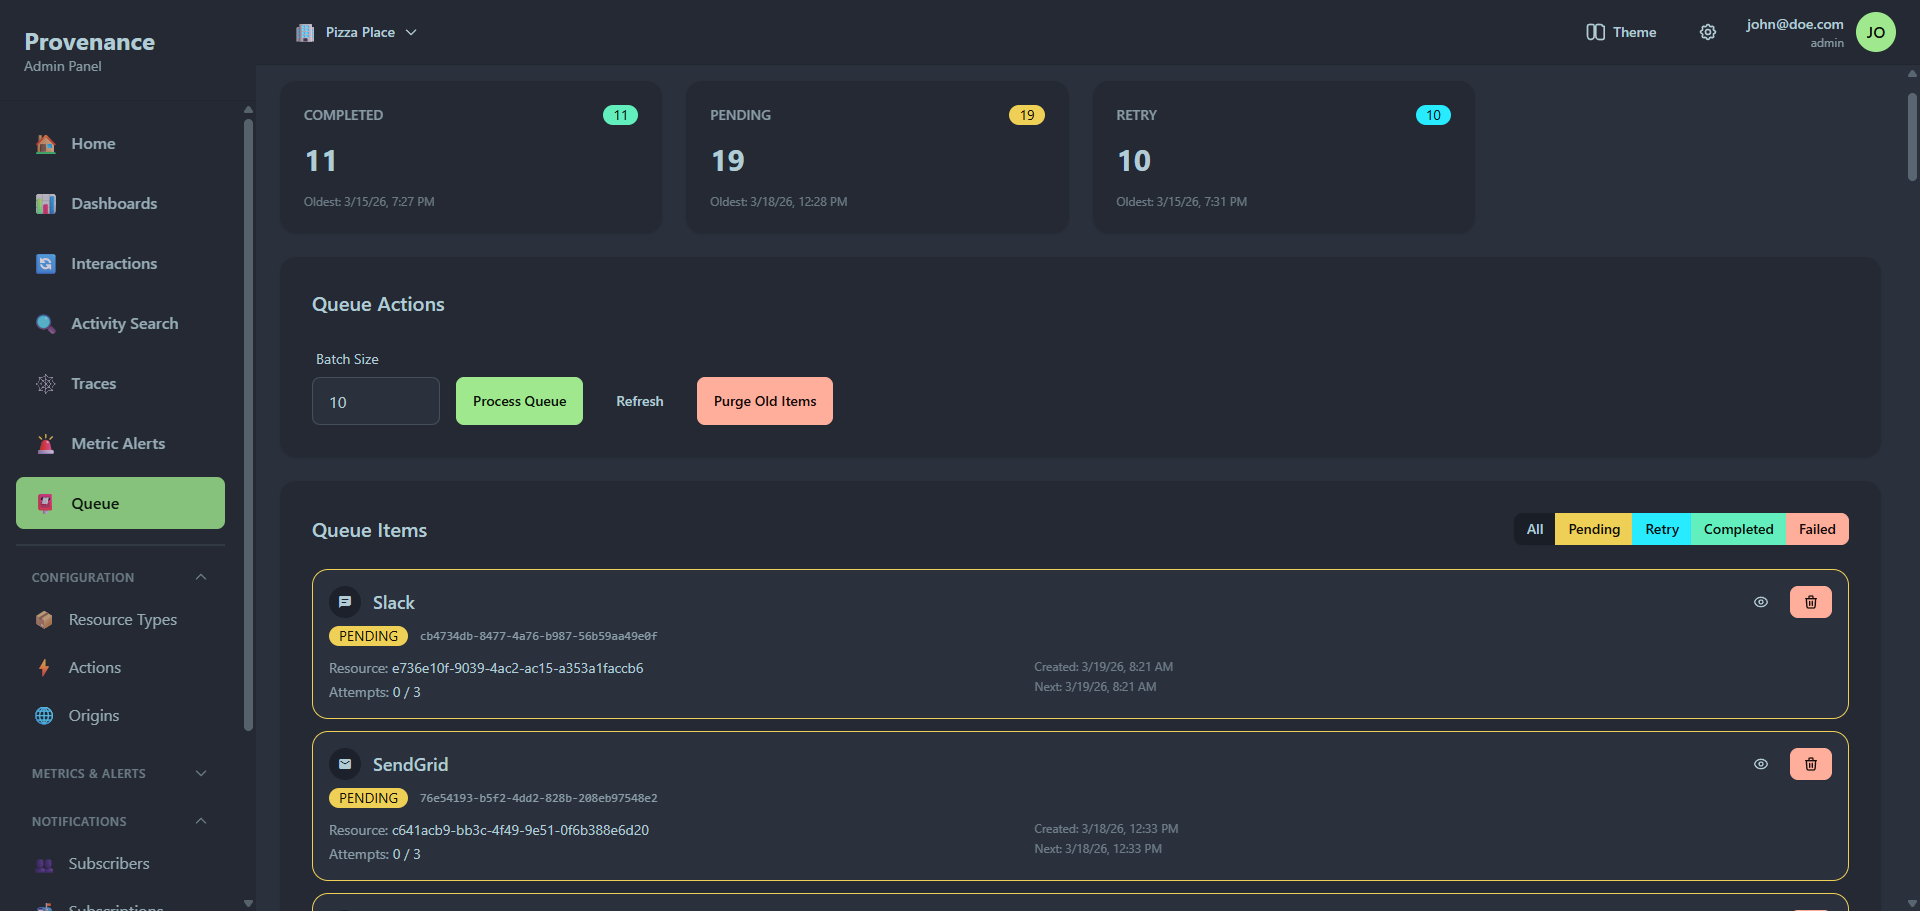
Status cards
Four cards show the current queue state:
| Status | Description |
|---|---|
| Pending | Notifications waiting to be processed |
| Retry | Failed notifications scheduled for retry |
| Completed | Successfully delivered notifications |
| Failed | Notifications that exhausted all retry attempts |
Each card shows the count and the timestamp of the oldest item in that status.
Queue actions
- Process Queue — manually trigger processing of pending notifications (configurable batch size, default 10).
- Refresh — reload queue stats and items.
- Purge Old Items — delete completed or failed items older than a specified date.
Processing results
After processing, a results panel shows each notification's outcome:
- Success (green) or failure (red) indicator
- Queue ID
- Error message (if failed)
- HTTP status code
Queue items list
A filterable list of all queue items. Filter by status using the button group: All, Pending, Retry, Completed, Failed.
Each item shows:
- Subscriber name and icon
- Status badge
- Queue ID
- Resource ID (from the interaction)
- Attempt count (e.g. "2/3")
- Timestamps — created, next attempt, or processed
- Error message (if failed)
Action buttons per item:
- View — open the detail modal
- Retry — reset a failed/retry item for reprocessing
- Delete — remove the item from the queue
Queue item detail modal
The detail modal has three tabs:
Overview
- Status badge with attempt count and timestamps
- Subscriber details
- Interaction details (resource ID, interaction ID)
- Error message (if any)
Payload
- Side-by-side view of the request payload and response (both as formatted JSON)
Lifecycle Hooks
- Execution results for any configured lifecycle hooks
- Each hook shows: function name, success/failure badge, execution time, result data, and error details
- Hooks are grouped by type (pre-send, post-send, etc.)